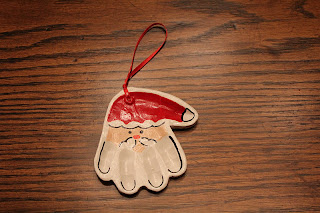
I was wanting to make Christmas ornaments to give to our parents, siblings, cousins etc. and while browsing on Pinterest (which is one of my favorite things now, by the way) I found the perfect idea to commemorate her addition to the family. I saw a picture of the cutest Santa ornament made out of a hand print. So my brain went to work deciding that I could do this myself and I came up with a plan.
First - I went to check out clay at Hobby Lobby (my home away from home). If you have never delved into the world of clay or modeling it can be a bit intimidating. At least it was for me. There is clay you fire, oven-dry clay, air-dry clay, self-drying clay, colored clay, modeling clay, clay you throw on a wheel and the list goes on. For no other motivation than cost, I settled on Amaco brand Play in Clay that is a self-drying clay in color white. I had no idea if it would work, but it was the cheapest and I thought I would give it a go. It turned out to be the perfect medium!
I set aside a day for ornamenting and chose a time when baby girl would be in a good mood since I needed her cooperation. I rolled out the clay (I actually ended up rolling in on a baking sheet that was lightly sprayed with cooking spray because I had some "stickage" problems when I rolled in out on the counter and it tore right through wax paper. I'm sure that is not the professional recommended thing to do, but you go with what works, right?) I then proceeded to press her little hand in to make prints making sure to leave a little room around each print to carve it out for the ornament.
After all the prints were done, I took a regular kitchen knife and carefully cut around each print. You don't have to cut all the way in between the fingers. I just followed the picture I had found on Pinterest. I'm sure a craft knife would work for this as well. I used small up-down cutting to prevent the clay from sticking to the knife and dragging.
I then just peeled away the excess clay. The edges were kind of rough, but after trial and error I figure out that you could wet your finger and smooth out the edges. I used a small knitting needle to get down in the points between the fingers and smooth them. I then laid each cutout on a cookie sheet and used the knitting needle to make a hole at the base of each hand to attach an ornament hanger.
Even though this is an air-drying clay, every thing I read about it said it could take up to a couple of days to completely dry. I was hoping for a faster drying time so after some research online I determined that I could place them in the oven on a low temp. I put them in at 200 degrees for about 5 hours. They dried like a charm! with no detectable shrinkage.
The next step was painting. I painted each ornament with white acrylic paint all over, making sure to get down in every crease and hole completely to form a complete seal. If the clay isn't sealed, moisture can seep in over time and soften the clay. When that was dry I just used the internet picture as a reference. I found that using a red paint pen for the hat and a black paint pen for the outlining was easiest. I did use a brush for the face color. Then I made sure to write the name and year on the back.
After the paint was completely dry, I spray painted them with a clear, acrylic gloss seal for the final coat. I bought a thin ribbon and used that as a hanger for the ornament. I love this keepsake ornament and look forward to passing it on to Olivia with her other ornaments. I will always remember her sweet little hand on her first Christmas and how thrilled I am to get to hold that hand as she grows and goes through life.
I ended up liking these so well I decided to use the idea for a dirty Santa gift exchange I had with my Waiting Moms group. These are all families who's lives are being touched by adoption and I have the privilege of meeting with them each week. What a wonderful support and group of prayer warriors they are! I'm so glad to have these sweet ladies and kids in my life.
I wish you all the merriest of Christmases. May God bless you in this season as we celebrate His Son's birth and in the coming New Year.
Erin


No comments:
Post a Comment